Dear Devorah,
Help! My laundry room is flying. It feels like the dump-all zone—nothing’s where it belongs, and no matter how many times I try to organize it, it never sticks. It’s just a mess.
– Lost in the Laundry Room
Dear Lost,
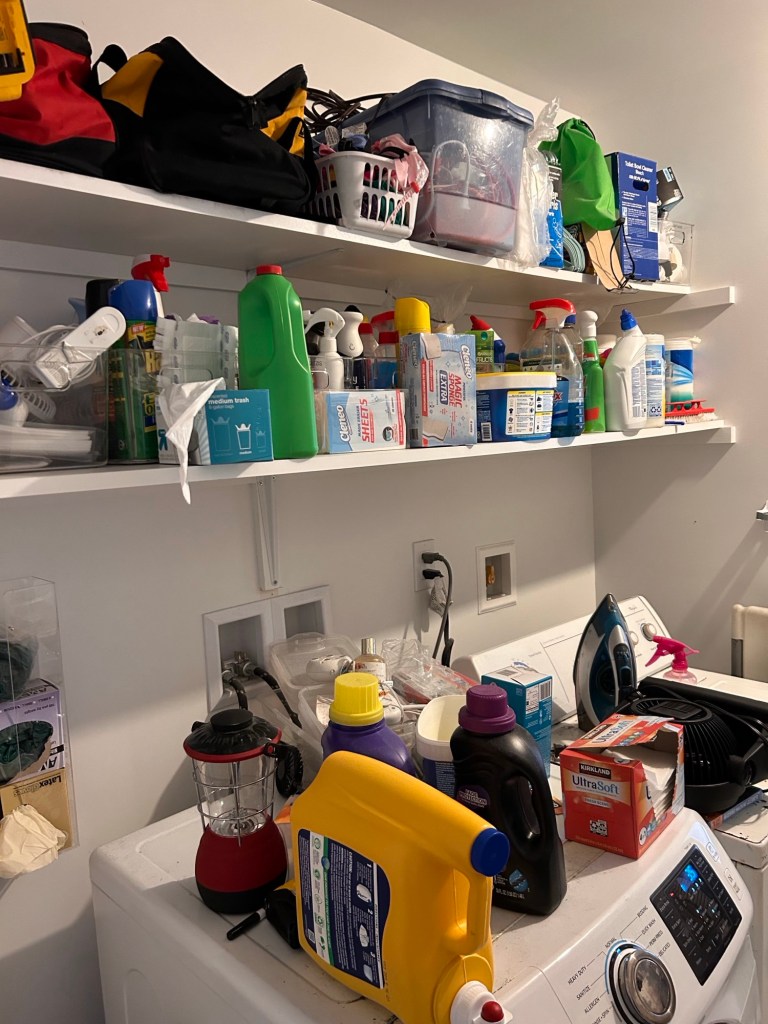
First of all, I see you. The laundry room has a special talent for attracting everything you don’t know what to do with.You walk in for a dryer sheet and come out with a staple gun, two birthday candles, and a roll of glue dots you haven’t seen since 2020.
But you’re not alone. Most laundry rooms double (or triple) as storage closets, cleaning supply vaults, mending stations, and “I-don’t-know-where-this-goes-so-I’ll-shove-it-here” zones. Which means step one is giving it a good, deep reset.
Let’s break it down.

Step One: Clear It Out—Then Think It Through
Before you organize anything, start fresh. Empty the entire space—yes, even the cabinet above the dryer that hasn’t been opened since the appliance guy was here.
Pull it all out. Every bin, drawer, bag, bottle, and box. Once it’s empty, don’t rush to sort. Pause and ask yourself a key question:
How do I actually use this room?
Not how you wish you used it, not how it looks in that Whirlpool advertisement —how do you and your family use it in real life?
• Do you fold laundry here?
• Hang items to dry?
• Store cleaning supplies?
• Keep batteries, tools, or light bulbs?
• Mend, iron, or sew?
Once you’re clear on what this space is for, then you can start making piles. Let your categories match your reality.
Common ones include:
• Laundry products
• Cleaning supplies
• Household tools or extras
• Sewing or mending items
• Backstock (paper towels, detergent refills)
• And most importantly: “This doesn’t belong here.”
That last one is where the surprises live—bundt pans, snacks, your kid’s bag of Pesach prizesthat mysteriously disappeared with the afikomen. Just because something made it into the laundry room doesn’t mean it gets to stay.
Take a minute and actually put those things away—where they belong. Yes, really. If you leave the “not for here” pile sitting in a laundry basket, it’ll just turn into tomorrow’s mess in a new location. Trust me on this one.

Step Two: Give Everything a Zone
Once your categories are set, it’s time to decide where each one lives. This is what we call creating zones—and don’t worry, it sounds more official than it is.
A zone is just a section of your laundry room that serves a single purpose. You don’t need a big space—just a bit of intention.
Some examples:
• Laundry zone: detergent, dryer sheets, stain sprays
• Cleaning zone: sprays, cloths, garbage bags
• Extras zone: batteries, light bulbs, tools
• Mending zone: sewing kit, buttons, scissors
• Drying area: foldable rack or hanging rod
• Backstock zone: refills, paper goods, overflow
You might need three zones, or you might need eight. That’s fine. What matters is that everything has a home—and that home makes sense.

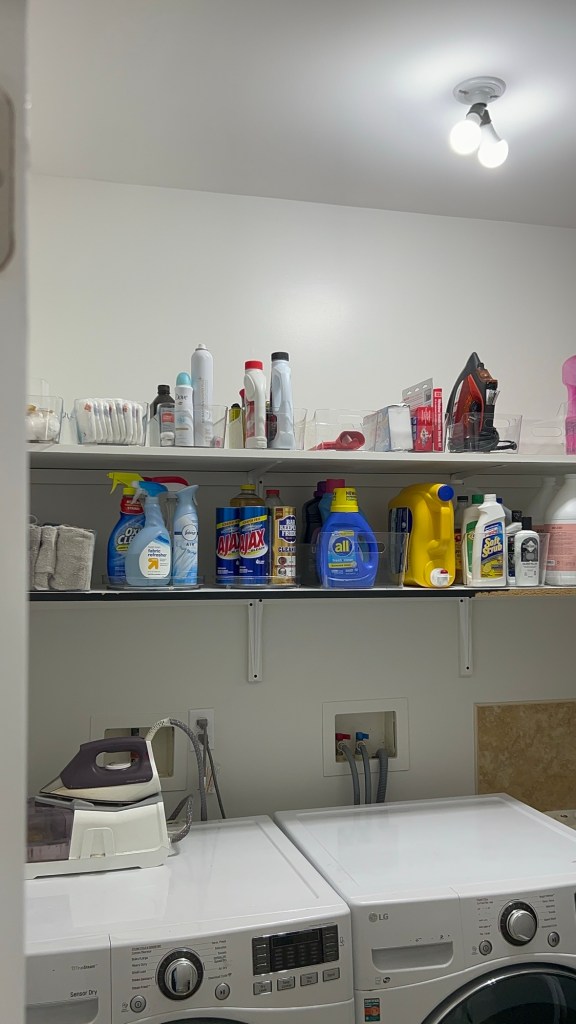
Step Three: Contain It with Bins
Now that you’ve planned out your zones, it’s time to give them structure.
Enter: bins.
Even if your shelves are behind doors, bins are what keep things from unraveling over time. They stop the dryer sheets from sliding under the bleach and prevent the batteries from ending up tangled in thread and tape.
Use what you have—plastic bins, baskets, drawer dividers, even old shoeboxes if that’s what’s available. Fancy containers are optional. Function is not.
Some ideas:
• Small bins for tools, sewing supplies, or batteries
• Medium baskets for sprays, bottles, and bulky items
• A handled caddy for things you grab often, like stain spray or clothespins
A few quick tips:
• Keep everyday items front and center
• Store extras and refills up high
• Corral lint rollers, dryer balls, and randoms in one bin
• Leave space to actually sew or fold if you use the room for that
• Don’t block the drying area—leave it usable
Before moving on, step back. Does it feel practical? Easy to maintain? If it looks too perfect to touch, you probably won’t.
Step Four: Label, Layer, and Add Smart Touches
Once your bins are set, finish the system with labels. Not because it’s cute—though it can be—but because it keeps everything in place.
Even if you’re the only one using the space, labels make it easier to reset the room when life gets messy. And if other people help with laundry? Labels save you from having to answer “Where does this go?” fifty times.
Now layer in a few small upgrades that make your space work even harder:
• A lost sock jar (because it’s always just one)
• A bin for things that need mending
• A tray for dryer sheets and cleaners near the machine
• A charging station for a steamer or cordless vacuum
If something still doesn’t feel right—adjust. Re-bin, re-label, or move things around. That’s not failure—it’s refining. A good system makes your life easier, not more rigid.
Final Thoughts: Your Laundry Room, Your Rules
When your laundry room works, everything else runs a little smoother. Fewer lost socks. Fewer mystery spills. Fewer frantic searches for the “good detergent” when it’s really just hiding behind a Costco-size paper towel pack.
This space doesn’t have to look like a showroom—it just has to work. For you. For your family. For your real life.
So whether you’re working with a tiny closet or a full-sized laundry room, here’s the plan:
Clear it out. Think it through. Create zones. Contain it. Label it. Add what you need.
And if your bundt pan still finds its way back in six months? Just smile, and walk it back to the kitchen—where it (probably) belongs.
Happy Organizing,
Devorah

Leave a comment